Get Creative: Make Decoration This Halloween

Make a Vampire Hallowe’en Decoration
You will need:
- Vampire template
- 1 A4 sheet of white paper
- 1 A4 sheet of black card
- 1 scrap of tissue paper or other coloured paper
- A glue stick Colouring pencils or pens Scissors
What to do:
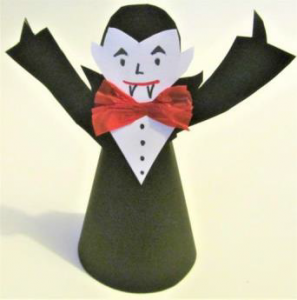
- Print out your vampire templates on to a sheet of A4 paper. Cut out the vampire body and glue it to the back of the black card, using it as a guide to cut out your vampire’s body. Remember to cut along the dotted lines under the arms.
- Cut out the vampire face and chest piece and draw on your vampire’s face.
- Stick your vampire face and chest piece on to the body piece (black cardboard side facing up), leaving the V-shape of black showing at the top of the head for the vampire’s hair (see the picture above).
- Take a small square of tissue paper (around 3cm) or other coloured paper and pinch it together in the middle to make a bow tie shape, then glue to your vampire’s neck. Draw four buttons underneath the bow tie to make the vampire’s shirt.
- With the vampire laid out flat on the table, take each of the arms and fold them inwards so that they stand out from the body.
- Glue along one straight edge of the vampire’s body piece as shown on the template, then roll the body into a cone shape, sticking the glued edge under the other straight edge. Hold in place until the glue dries.
- Use your finished vampire to decorate your home ready for a super spooky hallowe’en!
Make a Witch Hallowe’en Decoration

You will need:
- Witch template
- 1 A4 sheet of white paper
- 1 A4 sheet of black card
- Some scraps of wool for the hair
- A glue stick Felt pens or colouring pencils
- Scissors
- A few shiny star stickers or scraps of coloured paper to make your own
What to do:
- Print out the witch templates onto A4 paper.
- Cut out the witch body template and glue it to the back of your black card. Use the template as a guide to cut out the body of your witch. Don’t forget to cut along the dotted lines under the arms.
- Cut out the witch face template and colour it in then draw on a smiley face.
- With the black cardboard side of the witch body piece facing up, stick the witch’s face on to the body underneath her black hat (see the picture above).
- Glue on a few strands of wool to make the witch’s hair.
- With the witch laid out flat on the table, take each of the arms and fold them inwards so that they stand out from the body.
- Glue along one straight edge of the witch’s body piece as shown on the template, then roll the body into a cone shape, sticking the glued edge underneath the other straight edge. Hold in place until the glue dries.
- Stick a few shiny stars on to the witch’s body and hat, or cut out your own decorations from scraps of coloured paper.
- Use your finished witch to decorate your home ready for a super spooky hallowe’en!
Make a Spiral Ghost Hallowe’en Decoration

You will need:
- 1 A4 sheet of white printer card
- Colouring pencils or felt pens
- Scissors
What to do:
- Print out your ghost template on to the white card. If you don’t have a card suitable for your printer, you can print onto ordinary paper and glue it on to a piece of scrap cardboard e.g. an old cereal packet.
- Use a pair of scissors to carefully cut around your ghost head and arms, then continue to cut following the lines all the way around the inside in a continuous spiral.
- Use a colouring pencil or felt pen to draw a face on to your ghost. You can make it funny or scary or surprised—you could even draw a different face on the front and back of your ghost so that it looks different from each side when it’s hanging up!
- Hang up your ghost by the bottom of its spiral tail, or by its head, ready for a super spooky hallowe’en!
Make a Bat Hallowe’en Decoration

You will need:
- 1 A4 sheet of white paper
- 1 A4 sheet of black card
- 1 black pipe cleaner for the legs
- A glue stick
- Felt pens or colouring pencils
- Scissors
What to do:
- Print the bat template onto A4 paper. Carefully cut out the eyes and fangs and place them to one side for the moment, then glue the wings and body templates to the back of your sheet of black card.
- Cut out the wings and body from the black card, using the printed template as a guide. Lay your bat pieces out flat on the table, black side up.
- Colour in the eyes then cut them out and glue them into position on your bat’s face, just below the top curved edge.
- Cut out the fangs and glue them on to the bat’s face underneath his eyes.
- Using the glue stick, make a line of glue along one straight side of your bat body, then roll the body into a cylinder, and stick the two straight edges together. Hold in place while the glue dries.
- Glue the wings on to the back of your bat, covering the joined edges from the previous step. Hold in place while the glue dries.
- Take a black pipe cleaner and fold it in half. Glue the folded end to the inside of your bat (see the picture above)
- Curl the two cut ends of the pipe cleaner to make the bat’s talons
- Hang the bat upside down at home ready for a super spooky hallowe’en
We’d love to see your finished crafts — please tweet us a photo @MonLifeLearning @MonLifeOfficial Decoration